Friday, January 13, 2012

The Kiss Box


Has it really been last February since I last posted? Well, since then I have launched my new company (which encompasses mummynuggle?) called Country Chiq (www.countrychiq.com), and moved into a new home and community.

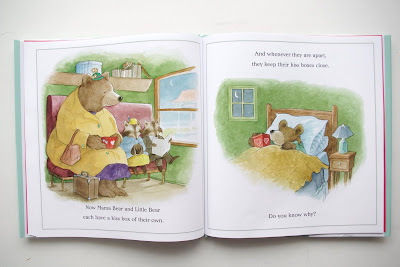
I just couldn't resist writing a post about this delightful book called "The Kiss Box" by Bonnie Verburg and Henry Cole. This book is so incredibly sweet, and it inspired a lovely lil' craft session with my daughters. The concept of the book stems from Mama bear having to leave her cub for a little while, and her baby bear is worried that he is going to miss his mama. Then he comes up with a fabulously cute idea: a kiss box.


The idea is to fill a box with a lots of kisses, and when cub or mama start to miss each other, they simply open up the box and imaginary kisses will comfort them!


So I didn't need an excuse to head on over to Michaels and buy 2 boxes (and loads of other "necessary" craft items) and a bunch of stickers for my daughters to decorate their own "kiss boxes".


   They even put heart stickers inside!


A sweet Valentine's Day gift idea is to wrap this book up along with a box, paint brushes and paint, stickers, and ribbon.

Wednesday, February 16, 2011

Easy Peasy Skirt


I came across a pattern for a skirt from NicoDesigns at http://www.etsy.com/listing/68239695/easy-peasy-skirt-a-basic-you-can-dress?ref=pr_shophttp://
and decided to give it a try! It was super easy, and then I added a ruffle on the bottom.

I found a cute little ruffle shirt from Joe Fresh for $10 and added it on top. This outfit gives me hope that spring is coming soon!

Sunday, February 13, 2011

Happy Valentine's Day


A final Valentine's Day craft came about with the age old idea of tissue paper flowers. I was reminded of this idea at a library craft class for my little girls, and decided to add it to my "collection".
Instructions for making tissue paper flowers can be found at http://crafts.kaboose.com/flower2.html

I found these frames either on the side of the road, at garage sales or thrift stores. I painted them white and hung them on little nails. I added felt heart stickers inside the frames and placed the tissue paper flowers in my old bottles found at a thrift store.


Enjoy your day, wherever it may take you!

A Valentine Birthday Party


We had a wonderful party yesterday to celebrate Sofie and Maya's 3rd birthday! I took a few pics of the dresses I made before the craziness of the party!


The cupcakes were a hit...


The parents loved the "wrap your parent in toilet paper" game... (PS..this can be quite humourous when your kids are potty training. My good friend Heather discovered this when her boys tried to wipe her behind!)


Pin the tail on the donkey was a success...way to go Lola who put the tail on the perfect spot on her first try!


Thanks to Auntie Nette and Joe for their balloon expertise!


These gifts were stunning, made by my incredibly creative friend Lidija.


Overall, the day was filled with good friends, good laughs and good food!

The after party turned into a cousin dress up event!


A huge thanks to all our friends and family who have supported, inspired and sustained us through the first 3 years of our little girls' lives.

Monday, February 7, 2011

Party Dress


I finally got around to making dresses for Sofie and Maya's Valentine/Birthday Party! Maya was so exicted to wear the dress that she just had to try hers out today. This dress is really nothing special, just a very simple pattern, but I am so new to using patterns that I am sticking to the same one for now so I can master the "pattern jargon".

Maya was so proud of herself because on a very rare shopping experience with just the two of us, she picked out the gingham buttons because they looked like her Raggedy Andy doll that her Grandma sewed for her!


The shirt underneath the jumper has three fabric roses that add a bit of life to the outfit.


Saturday, February 5, 2011

More Valentine Decorating Ideas


Sofie and Maya turn 3 the day after Valentine's Day, and I have been obsessively decorating our home for their birthday/valentine party. Here are a few more ideas to build on my last post.

1. Wood Garland
I found wood branches at the dollar store that inspired me to make a garland with hanging hearts that I had created a few years ago from cardboard, fabric, ribbon and lace. It is all held up by two thumbtacks.


2. Doily Garland
This garland is nothing special, just ribbon, doilies and fabric hearts.


3. Cinnamon Hearts
Who doesn't love these little treats? Just fill a jam jar up with cinnamon hearts and top it off with some cute fabric and ribbon!


4. Valentine Take-Out Boxes
I dreamed up the idea to jazz up my stairwell by hanging valentine take-out boxes from ribbon using scotch tape! Another fabulous dollar store find.


Friday, February 4, 2011

Valentine's Day Craft Ideas

The instructions for these sucker covers came from http://www.craftown.com/Sucker-Covers.html

I created a valentine garland using bias binding tape, paper and alphabet pop-outs from a dollar store.

These tulle balls were easy to make using instructions from http://www.momdot.com/how-to-make-a-tulle-pom-pom-ball.


The flower tins are simply tin cans I saved over the last few weeks and using a glue gun, I stuck on scrapbooking paper, ribbon and lace. I cut little branches down from a bush in my front yard and stuck them into tulle balls and fabric flowers. In order to have the flowers stand up, I went to Walmart and bought styrofoam for flower arrangements. I simply cut the foam to fit the cans and stuck in the branches.

I dreamed up this valentine garland one day when trying to incorporate my new obsession with fabric flowers. I used a thick ribbon, cut a small cross every 4 1/2 inches and used fabric glue and some twisting to stick the flowers in. I then stuck on felt heart stickers from the dollar store in between the flowers. Double-sided sticky circles from the dollar store attached the ribbon to the mantle (I am hoping that they don't strip the paint!).

The love message was created by simply lining up my daughters' blocks.


And finally, these are a few of my daughter's heart crafts!